This post may contain affiliate links. For detailed information please go to Disclaimer.
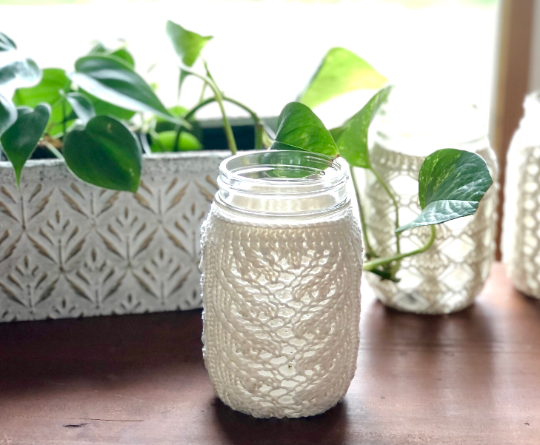
Last month, I introduced 1st mason jar cover as a quick knitting project for the summer. The pattern I published is “flowers” (picture below). As I promised, I worked on the 2nd pattern “Leaves”.

About Design
This quick knitting project starts with Emily Ocker’s Circular Cast On, also called a pinhole cast on. It is called pinhole because where you cast on becomes almost invisible! So, it is one of my favorite ways to cast on my round project.
After the cast on, this project is worked in the round. I love using Magic Loop Method to knit round items, but you can also use double-pointed needles for this project. The next step is to make the bottom part of the cover. I used YO (Yarn Over) stitch for the increasing rows. So it will give a lace look. Then moved on to the main lace pattern. To complete the pattern, you need to know how to K2tog (knit two together) and SSK (Slip Slip Knit). Click the links to the tutorials if you are not familiar with those stitches.
You can also follow along on the video here👇👇
Yarn Used
For this project, I used Cascade 220 Ultra Pima Cotton yarn.
It is a DK weight Yarn, and one hank is 220 yards per 100 grams. It is 100% Pima cotton yarn, a higher quality material than regular cotton. It is known to be softer but stronger and has a lovely silky texture. I used colorway natural, but this line offers so many colorways. So I’m sure you can find your favorite color. For a side note, there is Ultra Pima Cotton fine which is a sports weight yarn, so be careful when you are purchasing.

Pattern
- Get the ad-free, printable PDF pattern: Click HERE for the Etsy shop
- Add to your Ravelry Queue: Click HERE (Ravelry download is also available with purchase)
- Save this pattern for your future project on Pinterest: Click HERE to pin.
Materials
- Size E (3.5mm) or similar sized Crochet Hook for cast on.
- US 6 (4 mm) Circular Knitting Needles (22″ or the length that you prefer for the magic loop method.) OR Four US 6 (4 mm) Double Pointed Needles.
- DK Weight Yarn. Approximately 40 yards to make a cover. I used Cascade Ultra Pima Cotton Yarn.
- 1 Tapestry Needle

Gauge and Finished Measurement
- 4″ x 4″ =24 sts x 28 rows
- It fits a pint-size Mason Jar (Measurement of the jar in the picture is listed below)
- 2.4″ bottom diameter which widens to 3″diameter.
- 10 1/8″ body circumference.
- 5″ tall from the bottom to the top.
- 3/4″ of which is the top rim.
- Measurement of the finished cover:
- Approximately 5.5″ long x 3.5″ wide lying flat without blocking. It will stretch as you put it on the jar.
Abbreviation
K – Knit
St(s) – Stitch(es)
CO – Cast On
DPNs– Double Pointed Needles
YO – Yarn Over
K2tog – Knit 2 stitches together
SSK – Slip, Slip, Knit: Slip two stitches knitwise onto the right needle, one at a time. Insert the left needle through the front of those 2 slipped stitches. Wrap your yarn around the right needle and pull the loop through (knitting them together through the back loop).

Main Pattern
CO 6 sts. using Emily Ocker’s Circular Cast On. Divide stitches evenly onto each needle. Knit in the round using the magic loop method or DPNs.
Round 1: *YO, K1; repeat from * to the end.
Round 2: *YO, K2; repeat from * to the end.
Round 3: *YO, K3; repeat from * to the end.
Round 4: *YO, K4; repeat from * to the end.
Round 5: *YO, K5; repeat from * to the end.
Round 6: *YO, K6; repeat from * to the end.
Round 7: *YO, K7; repeat from * to the end.
Total of 48 sts.
Work on the main pattern as follows:
Rnd 1: *P1, K3, K2tog, K2tog, YO, K1, YO, K1, YO, K1, YO, SSK, SSK, K1; repeat from* to the end.
Rnd 2, 4, 6, and 8: *P1, K15; repeat from * to end.
Rnd 3: *P1, K2, K2tog, K2tog, YO, K1, YO, K3, YO, K1, YO, SSK, SSK; repeat from* to the end.
Rnd 5: *P1, K1, K2tog, K2tog, YO, K1, YO, K1, YO, K1, YO, SSK, SSK, K3; repeat from* to the end.
Rnd 7: *P1, K2tog, K2tog, YO, K1, YO, K3, YO, K1, YO, SSK, SSK, K2; repeat from* to the end.
Repeat Rnd 1 – 8, four more times. On the last repeat, stop at rnd 6. DO NOT work on rnd 7 and 8.
Work on the edge as follows:
Rnd 1: KTBL all stitches.
Rnd 2: Knit.
Repeat Rnd 1 and 2, one more time.
Bind off and weave in the ends.
If you enjoyed this free pattern, please buy me a coffee to support my work 😊 It will help me create more free knitting patterns and tutorials.
Please come follow me on Instagram, Ravelry, and Pinterest to get updates! Also, join the Facebook or Ravelry group “Palmeri – LOVE to knit Group” to meet more knitters! I would be so grateful if you could share your finished projects on these platforms to spread the word💗


